Tampilkan postingan dengan label for. Tampilkan semua postingan

Rabu, 11 Mei 2016

a fun and challenging repair

,
very presidential
 
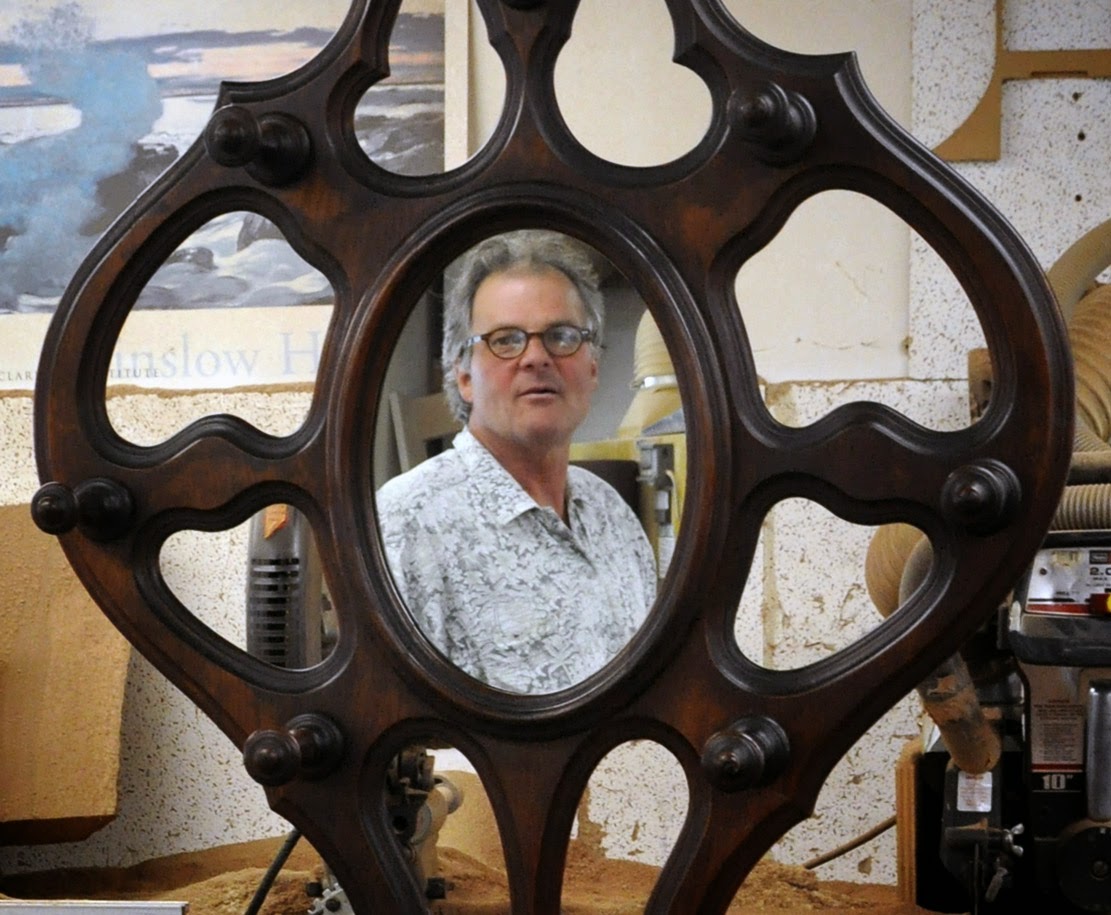
well, we had a couple chuckles today .. we finished this repair and i was taking a quick record photo and caught jim in the dollar bill pose.  lookin good in there, dont ya think?  anyway, the orange lines in the photo denote all the places this piece was broken when we picked it up .. it is a family heirloom that was standing quietly in the owners garage just after arrival, when the arm thing on the top of the automatic garage door just nicked the top and tipped it over on its face as it was closing.  small disaster .. all better now.  click the photos to enlarge them ..
it took a few clamps and a bit of fussy work to get everything lined back up and reglued.  it also required some imaginative clamping fixtures due to all the holes and rounded edges ... we got it though and it looks good as new for an antique.  these things must have been really popular at one time cause there are about a million different pictures of em on google images.  check it out
seriously, a half million at least ..


looked great in its home place
it even had a pair of sweet cast bronze, mirror image scallop shells for the base .. very cool ..

Read more

Making Ornaments Finally Finials!

,
Sorry for the alliteration, I know its a bit annoying.  Anyways.  Making the finials is the last step before assembly.  These take an inordinate amount of time when its too cold to work in your unheated garage.  Basically, its all my fault for the delay.  Check out the post and Ill show you what happens when you get in a hurry!
First off.  Wow, sorry it took so long to get this next step on the blog.  Cold weather and life have kept me away from the shop more than usual since my last post.  Meanwhile my faithful reader(s?) has been waiting for a conclusion to this project.  Fear not.  The conclusion follows.

Interestingly enough, the last issue of the AAW magazine hosted an article specifically to turning finials.  There are also several YouTube videos that have great detail about turning finials also.  Hopefully Ill add videos to my posts some day, but till then youll just have to read along.

I am using Ebony for the finials in this project.  I think the Bradford Pear globe and the Ebony finials will make a great combination.  Ive worked with Ebony a fair amount in guitar building, but have never turned it.  I was happily surprised with how well it behaves on the lathe.

Instead of using a piece of 1.5" square material to make the finials, I segmented the construction.  Since Ebony is expensive, I opted to conserve as much material as possible.  The two flat squares (1.5"x1.5"x.5") pictured below will be the "collars" and the rectangular piece (1"x1"x4") will be the finial.


Finial Stock

To turn the collars, I start by friction driving the piece between the chuck and the tailstock.  As you can see, the jaws of the chuck are fully closed and the piece of Ebony is only being driven with friction.  Now, before you just willy nilly toss your piece on the lathe, you need to create a flat surface on the side that sits against the chuck jaws.  I accomplished this with a large stationary sanding block that recesses into my workbench.  You need to make the piece flat enough to create adequate surface contact and prevent the piece from rocking off the surface of the jaws.  Once thats done, just sandwich the piece between the jaws and tailstock.  The jaws Im using are the Nova pin jaws.


Friction Turning

Light cuts are in order here.  If you take too heavy of a cut the jaws will just spin on the flat surface youve created.  Once you ease up on the pressure, the piece will start spinning again.  The objective of this step is to create a tennon that will recess into the globe.  This tennon is also used as a chucking point to shape the outward facing surface of the collar.


Friction Turning

With the collar reversed, you can create your design and drill a center hole for the finial to locate into.  This is also the time for sanding and finishing.  I sand up to 600 then burnish and 0000 steel wool the piece.  I apply paste wax with the steel wool also.  This allows the wax to go on more evenly as the steel wool holds onto the wax better than a paper towel does.  I crank up the speed and let the piece just run for a bit until the wax is ready for buffing.  Grab a clean paper towel and apply moderate pressure to build up some heat and really make the piece shine.


Turning the Collar

Now on to the finial.  Start of with the piece between centers or in the chuck and turn a tennon for a chucking point.  Looking back on it, I could have turned the finial without having to rechuck it.


Finial Blank
The reason I did turn a tennon and rechuck the piece is so that I could accurately put the piece back in the chuck if I happened to "dig in" and cause the piece to no longer run true.  You are less likely to do this if the piece is held as securely as possible, which a tennon affords you.

Finial Blank with TennonFinial Blank Reversed
With the tailstock removed, I begin to shape my finial.  When turning finials, it is imperative that you start at the end farthest from the headstock and work your way towards the headstock (right to left).  I like to design while at the lathe most of the time, and was really pleased with the shape I was creating.  I do have a problem though.  I start to get really excited about finishing the rest of the piece sometimes...

Tiny Details

 And then this happens.  I usually just mutter under my breathe when I screw something up, but not this time... Well just leave it at that.  If nothing else, I have a nice start to a spire, right?


Disaster

I decided to not take process pictures while making this finial because, well you saw what happened to the last one right?  A camcorder would have been helpful here, but these are the basics.  

Finial Finished

As I previously mentioned, work from right to left and completely finish one section before progressing closer to the headstock.  

I use a 3/8th spindle gouge that has the wings ground back like an Irish grind and I shape a 1/8" nose on the end.  The cuts I perform in the process of making finials are a pull cut (similar to bowl gouge), a push cut, and a planning cut.

When cutting with the nose of the tool (push), point the tool in the direction of the cut you want to make and "rub" the bevel.  Swinging the end of the handle at differing speeds while advancing the the cutting edge will allow you to create a range of arcs.

For cutting small details, start with the gouge in the neutral position (flute closed) and just push the tip of the tool into the wood.  This presentation of the cutting edge will prevent the tool from skating left or right.  From this same entry method, one can make coves by opening the flute as you advance the tool.  

I mainly reserve the pull cut for removing wood as I work towards the headstock.  With the flute opened to about 45° to the left, start on the right side of your cut (not touching wood) and steadily advance the tool to the left into your stock.  Just reverse the flute to the right and feed to the right to cut in the other direction.  Maybe that was obvious, but maybe not...

Finally for the planning cut.  I use this technique to take light cuts and blend long tapers or curves on the long narrow section of a finial.  The flute of the gouge is mostly closed with the tool angled at about 30° up and down.  I generally perform this cut from left to right.  In this orientation, the tip of the tool is pointing up and to the left, while the handle is pointed down and to the right.  With light pressure, glide the wing of the gouge along the wood.  This will produce thin curly shavings and is a great way to finalize a subtle taper or curve to a finial.

For really small details, I use a skew chisel that is turned on its side with the point side against the tool rest.  The lightest touch is all you need to add a crisp detail to your corners.  Sometimes, Ill also use a utility knife for these details.

If I totally lost you while describing my process, there are excellent videos on YouTube for turning finials.  Id highly recommend checking out Cindy Drozdas videos, such as this one.

Thanks for reading, guys. Ill have another post soon showing the assembly photos and the final product.  As always, feel free to ask any questions you may have.
Read more

Selasa, 10 Mei 2016

old woodworking tools for sale

,

#1: old woodworking tools for sale its good

Old woodworking tool parts for sale, Delta woodworking tools; craftsman woodworking tools; rockwell woodworking tools; oliver woodworking tools; boice crane woodworking tools; walker turner woodworking tools. Woodworking tools for sale, Antique woodworking tools for sale. woodworking tools for sale. the woodworking tools below are listed for sale..

Delta Unisaw - 10" Tilting Arbor Circular Saw (1949)

Jon zimmers antique tools, woodworking planes for sale, Jon zimmers antique tools, antique and collectible tools for sale, smooth planes, jointer planes, router planes, molding planes, antique planes of all types for sale. Vintage woodworking tools, antique woodworking tools, Tias carries a wide variety of vintage and antique woodworking tools. check out our selection of over 500 products!.

Vintage woodworking tools, antique woodworking tools, Tias carries a wide variety of vintage and antique woodworking tools. check out our selection of over 500 products!. Old woodworking tools ebay - electronics, cars, fashion, Newly listed lot antique woodworking old tool plane l bailey stanley 75 bullnose rabbet. Antique tools for sale from antique tools for sale, Antique tools for sale in this section of our website.. Vintage tools and antique tools for sale, Vintage tools and antique tools for sale welcome to the home page for vintage and antique tools and instruments. this site includes antique and vintage tools and. Wood working tools - jon zimmers antique tools, Jon zimmers antique tools, antique and collectible tools for sale, woodworking tools for sale, metalworking tools for sale, user tools for sale. Woodworking tool sale - fine woodworking tools, Woodworking tool sale at highland woodworking, selling fine tools since > 1978.

Gerstner Wood Tool Boxes and Gerstner Wood Tool Chests


Gerstner Wood Tool Boxes and Gerstner Wood Tool Chests

Vintage Wood Plane: Grandfathers Woodworking Tool, original painting


Vintage Wood Plane: Grandfathers Woodworking Tool, original painting

Delta Unisaw - 10" Tilting Arbor Circular Saw (1949)


Delta Unisaw - 10" Tilting Arbor Circular Saw (1949)

Read more

Wood use in medieval Novgorod

,
Yesterday I received a new book on medieval woodworking by post: Wood use in medieval Novgorod. This very interesting 470 pages book is edited by Mark Brisbane and  John Hather and was published by Oxbow Books, Oxford, UK in 2007 (ISBN 978-1-84217-276-6). With the book also comes a cd containing around 500 images of archeological objects. For those interested, it is still available for only 19.9 UK pounds. 
 

Novgorod was the captital of a medieval Russian republic, with a govenor chosen among the aristocracy. The city served as a major trading post with Scandinavia and the Hanseatic League. The city is situated somewhat halfway between Saint Petersburg and Moscow, next to immense forests and Lake Ilmen. The availablility of vast amounts of wood made it the prime source of material for this town, from housing, roads, furniture, tools, daily utensils, etc. Combined with the watery surrounding this created an ideal anaerobic condition for preserving wooden artefacts, ranging from the 10th century till the 16th when water drainage became common. Excavations have taking place at various sites in Novgorod since 1933 onwards, and an unprecedented amount of medieval objects and structures have been found and preserved. Due to the fact that large wooden structures are found, precise dendrochronological dating of the objects can take place. Unfortunately the research results were published in Russian journals, books, unreadable and unobtainable for many of us. This book solves that problem. It provides a good summary of what has been found and describes the current state of research, including many line drawings and photos (highlights) of the actual wooden finds. As an extra, a cd is added with colour images of some finds.


Clawhammers and nailpullers from Novgorod. (a-c) 14th century, (d) 13th-14th century, (e) 13th-15th century, (f) 15th century (g) 13th century, (h) 11th century nailpuller, (i) undated nailpuller. Note that the clawhammer handles sometimes ends in a twisted bit.

 Two turned mallets from Novgorod from pine and ash.

Chapter 3 of the book is dedicated to medieval woodworking tools. This chapter gives a short description of the tools, along with line drawings. There are however some peculiarities among the finds. The axes discussed show only felling type axes. The typical broad axe or side axe, common for the western medieval woodworking trade is not mentioned.  The boring tools mentioned in the book are spoon bits that were fitted in wooden handles like augers and gimlets. No mention is made of wooden braces, which became common in Europe in the 15th century. If you take a careful look at the spoon bits, e and f could easily have fitted into a brace, though the former is dated too early. Another missing tool is the plane. There is no mention of plane blades or wooden plane bodies found. The tools shown which crudely can perform the same function as planes are adzes, inshaves and scorps. Most interesting in this chapter, however, is the find of a spokeshave dating from the 11th century. So far, the earliest mention of a spokeshave is from 1510 (W.L. Goodman, The history of woodworking tools).

 
Novgorod boring tools/ spoon bits. (a) 13th-14th century, (b-d and i) 12th century, (e and h) 13th century, 
(f) 14th century, (g) 12th-13th century.

The chapter on household objects includes a picture of the furniture used in medieval Novgorod. So far excavated furniture fragments show that it was only very basic. I will dedicate a future post to discuss the Russian medieval furniture. Other chapters deal with housing, agricultural and fishing tools, games (including the over 200 chess pieces found and several Nine Mens Morris or Merrills game board), combs, tally sticks, musical instruments, turning and turned objects, lasts for shoe production, spinning and weaving, tribute collecting seals, barrels, transport devices, combs, toys, wax tablets, etc. All in all, the book gives a fine overview of what is found in medieval Novgorod. I wished I was able to read Russian and had access to the other works on wood use in this intriguing place.

 Nine Mans Morriss board, late 13th-14th century, made of spruce.
The back of the board, showing another game board.

Read more

Minggu, 08 Mei 2016

Look Where to buy wood for projects

,

Useful Where to buy wood for projects must try

Wood pallet projects: cool and easy-to-make projects for, Wood pallet projects: cool and easy-to-make projects for the home and garden paperback. We, Best answer: http://www.justgaragekits.com/ http://www.abshomes.com/html/panel_optio… http://www.cabins.ca/ http://www.steelmasterusa.com/garages/in….

- DIY Project Supplies - Classical Rubber Band Launcher Wooden

Www.woodcrafter.com - wood craft wooden products, Offering wood craft supplies as well as traditional art supplies.. Where to buy beer online - the beerfathers beer blog, The beerfathers share their thoughts on where to buy beer online in their beer blog..

Where to buy beer online - the beerfathers beer blog, The beerfathers share their thoughts on where to buy beer online in their beer blog.. Binkys woodworking - how to build projects, 100s of free, Free woodworking plans and advice for the novice to intermediate woodworker.. 1927 countryside lane diy projects at our new-ish home, Diy projects at our new-ish home (by chris millspaugh). How to transfer prints to wood: an awesome photography diy, A post by: james brandon. one thing i love about my family is that there never seems to be a shortness of creativity floating around. my wife kristin works with her. Do you love where you live, A collection of things to improve your life and where you live. Easiest way to get old paint off wood furniture? - yahoo, Best answer: heat gun. warm it up, scrape it off. wear gloves. do it outside, keep water close in case it catches fire. before you can start the.

Plans For Bed » Blog Archive » Beginner Woodworking Plans Do You


Plans For Bed » Blog Archive » Beginner Woodworking Plans Do You

where to buy wood working tools where to find the best buys


Where to buy wood working tools where to find the best buys

- DIY Project Supplies - Classical Rubber Band Launcher Wooden


- DIY Project Supplies - Classical Rubber Band Launcher Wooden


This Where to buy wood for projects


Where to buy wood for projects ,
10 out of 10 based on 55 ratings
Read more

Jumat, 06 Mei 2016

a railing for a tansu stair cabinet

,
chris and i installed the railings today. all in, all done, as they say.  
i am happy to cross that one off the to do list.  we made some other stuff
 in the room there, like the mantle with burl and abalone detials, and the coffee table.  you can even see some of jims (aka mr. lucky) carved glass work from the 80s on the coffee table.  nice room.
back in 1989, when we had been at our craft full time for 9 years, we built this sweet tansu stair cabinet, based on a postcard my clients had picked up in a hotel in japan or china, i forget which.  anyway, id already made them a bunch of stuff, and in this spot, they had one of those slightly treacherous 60s era welded steel spiral stairways, and a desire for a place to hide the stereo.  the stereo went behind the double doors, and originally, i think, the speakers went behind the single doors.  that was fine for, oh, 24 years, until grandchildren came on the scene .. time for a railing ... click the photos to enlarge them.
we did a little photoshop work, talked about different combinations of wood and metal ..
and finally made a plan.
chris and i made some poplar temporary posts and took some cardboard to the house and made some rough templates and notes on fitting the posts to the treads and figured out how to attach them.  luckily, there were all those drawers we could remove and we just screwed into the half lapped posts from inside the casework .. a true no brainer.
we were able to translate that information into cad drawings from which we made the real cherry posts and rough templates on the cnc.  we took those back to the site and installed the cherry posts, took some more notes, and turned those notes into cad drawings and the templates below that sam could weld the actual railings together on.

we hand shaped the top caps to mimic the original handraill and fitted them to the railings in the shop.  today, it all fit and we bolted them in place to make a surprisingly rigid assembly up to code and ready for kids.

it all fit like a glove, and in the background you can see the end volute of the original hand carved handrail.  this was a satisfying project, and a nice visit with an old friend.  good job sam and chris !!!
Read more

Kamis, 05 Mei 2016

worst case scenario

,

i just received notice that an installation originally scheduled for november 
and then january, has been postponed to mid february .... 
just after, i passed this new yorker cartoon that is on my office bulletin board
and had a little chuckle.
Read more

Home depot woodworking vice

,

For you Home depot woodworking vice must try

The home depot, We are the worlds largest home improvement specialty retailer with stores in all 50 states, the district of columbia, puerto rico, u.s. virgin islands, canada. Irwin 5 in. multi-purpose vise-4935505 at the home depot, Acquire the 5 in. multipurpose vise 4935505, incorporated anvil the vise has a fused steel handle and a swivel base for strength and convenient use from the home.

In. Wilton Woodcraft Vise

Rockler - woodworking tools supplies hardware plans finishing, Shop for woodworking tools, plans, finishing and hardware online at rockler woodworking and hardware. find thousands of woodworking supplies like drawer slides. Man slices arms with saws at calif. home depot, West covina, calif. — a man deliberately cut himself with saws in the aisles of a home depot store in suburban los angeles on wednesday, creating a.

Man slices arms with saws at calif. home depot, West covina, calif. — a man deliberately cut himself with saws in the aisles of a home depot store in suburban los angeles on wednesday, creating a. Woodworking projects ebay - electronics, cars, fashion, Find great deals on ebay for woodworking projects in books about nonfiction. shop with confidence.. Gun vise - by woodscrap @ lumberjocks.com ~ woodworking community, This is a gun vise i made for my father in-law. it is black walnut with leather pads and pewter hardware. he wanted something to hold his rifles when he cleaned them. Integrated marketing communications campaign, Running head: ikea 2imc campaign executive summary ikea holds 10 percent of the market share in the united states in the industry of home. How to make wood bowls ehow, How to make wood bowls. the history of making bowls of wood is a long one, probably dating back to the time when man discovered he could shape the wood. Shop at the home depot ship to latin america & caribbean, Shop at the home depot in the us and receive your package in latin america and the caribbean.

RYOBI vs SKIL Benchtop Drill Presses - Router Forums


RYOBI vs SKIL Benchtop Drill Presses - Router Forums

 Home Depot 2 x 4 studs - by jksmith69 @ LumberJocks.com ~ woodworking


Home Depot 2 x 4 studs - by jksmith69 @ LumberJocks.com ~ woodworking

In. Wilton Woodcraft Vise


In. Wilton Woodcraft Vise

Read more

Rabu, 04 Mei 2016

Koln for medieval furniture

,
Is there more medieval furniture in Cologne? Yes, there is! So the pictorial story of the medieval furniture continues from the previous two posts  ... and ends here with two early renaissance pieces of furniture from Italy.


This payment/administrative work table originates from the lower Rhine area and dates around 1500. The table is supposed to come from the Cloister Kamp near Moers, Germany. This type of medieval furniture evolved in the late middle ages as a combination of a chest and a table, and was used for money storage and payment counter. The table-top is made of two layers which are movable. When opened, they reveal a small removable chest with eight drawers. The front of the table has a  panel-door with an iron lock. The table is made of oak and measures 86 x 118 x 64.5 cm.

  
 The front of the table shows two locks. The upper large one is for the sliding table top, and the lower small one for the carved panel-door.

 
 The top of the table is reinforced by iron bands.

This small rectangular cupboard is made from oak and originates from the Rhine area around Julich and Aldenhoven. The cupboard has two doors with iron hinges and simple locking systems for a  padlock. On the top of the cupboard is a hole, now covered with an iron plate, suggesting that once a turnable lectern used to be here. The cupboard dates from around 1500 and measures 119 x 81 x 61 cm.

 
The panels of the top and bottom of the cupboard are differently decorated. the upper show the X-motiv, 
while the lower panels are carved  linenfold.

This large two-doored armoire dates from the first half of the 16th century and is made from oak. The panels are decorated in linenfold. The lock of the armoire is behind the doors, only a small keyhole can be seen. This type of decorated armoire was primarily made in Flanders during the 15th century, but continued to be popular in the 16th century.  Sizes of the armoire are 170 x 185 x 62 cm.


This small armoire dates from 1548 and originated from Dortmund, Germany. The construction of the armoire is old-fashioned for this date, however the crone of the armoire has a more up-to-date style. All parts were made from the same oak tree, and dendrochronological testing also dates the armoire from around 1545. The armoire measures 157 x 74 x 50,5 cm.

The upper door has a carved relief of two angels wearing long dresses, in which also the date 1548 is carved.. 
Left and right of the door are two carved names of the former owners Beleke and Berswort. The crone is carved with a medallion of Maria and child, flanked by two medaillions with heraldic arms.

This Italian chest or cassone dates from 1495 and originates from Florence. The style of the chest is renaissance. The body of the chest is made of poplar and the carved sides are of walnut. The cassone is decorated with geometric intarsia made from maple, ebony and black-painted wood from a fruit tree. Some parts of the chest are veneered with walnut. Also the inside of the chest is decorated with intarsia. The sizes if the chest are 88.5 x 195 x 71 cm.

 
The side of the cassone with the walnut carving.
 
This chair has escaped the catalogue of the MAKK - I could not find it in the book and have only my own notes. It is an sgabello from northern Italy, dating from the first half of the 16th century. It is made from walnut. The sizes are unknown to me, but a similar sgabello, which is described in the catalogue measures 105 x 31 x 42 cm with a seating height of 56 cm.

 
The seat of the sgabello is eight-sided and has some small diamond intarsia. 

This photo shows the construction of the leg boards of the sgabello. Two rails at different levels support the two leg boards. 
Just beneath the seating there are small boards at the sides.
Read more
 

Blog Woodworking Plans Copyright © 2016 -- Powered by Blogger